Why container vulnerability analysis in the cloud is trickier than it looks
When you move workloads into Kubernetes or any other orchestration platform, it’s tempting to think: “I’m using official Docker images, I’m fine.” That’s usually wrong. Base images arrive with outdated libraries, teams add random tools during debugging, and images keep living in registries long after someone forgets they exist. In cloud environments, that mess gets amplified: more teams, more pipelines, more regions, and way less visibility. That’s where análise de vulnerabilidades em containers e imagens really matters, and why plugging a scanner de segurança para containers em nuvem straight into your registry and CI pipelines is no longer “nice to have”, it’s table stakes if you care about production not turning into a CTF arena for attackers.
A good mental model: every image in your registry is a mini‑Linux distro you’re responsible for. If you wouldn’t put an unpatched VM on the internet, you shouldn’t deploy an unscanned image into your cluster, especially in shared cloud networks where lateral movement is cheap.
Different approaches: where to plug the scanner
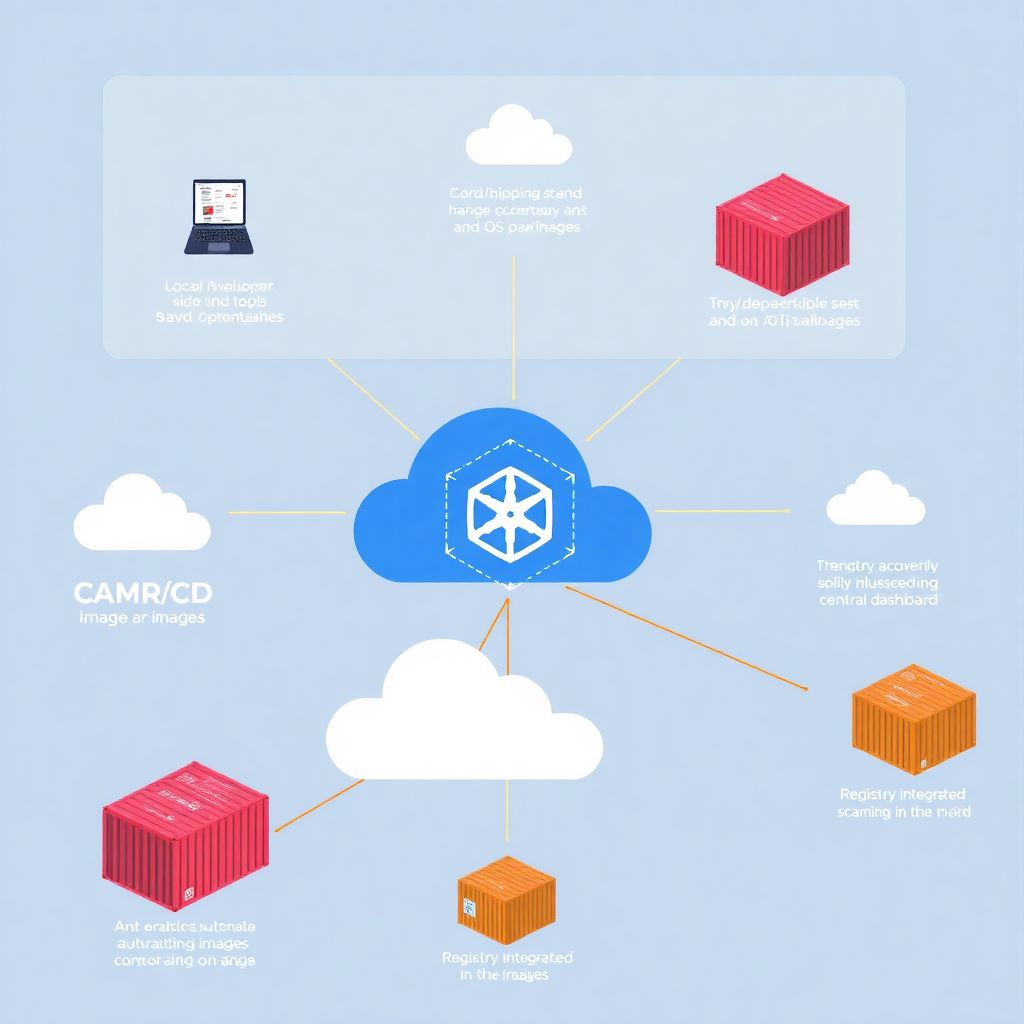
Broadly, you have three main strategies. First, local or developer‑side scanning: tools run on laptops or dev environments, checking Dockerfiles and built images before they ever reach a shared registry. Second, CI/CD pipeline scanning, where each build or merge triggers ferramentas de análise de vulnerabilidades em imagens docker right after the image is built. Third, a scanner de vulnerabilidades integrado a container registry, where the registry itself (cloud or self‑hosted) automatically scans any pushed image and keeps a running inventory of issues. In practice, mature teams mix all three, but they lean harder on one of them depending on culture, budget, and how centralized the platform team is.
If you’re starting from zero, the registry‑integrated approach often gives the quickest visibility: you point the scanner at your existing registry and suddenly see the true state of your images without touching every pipeline at once.
Approach 1: local and developer‑centric scanning

Local scanning focuses on fast feedback for developers. Tools like Trivy, Grype or Snyk CLI are run from a laptop or pre‑commit hook, scanning Dockerfiles and local images before anyone pushes them. The upside: developers catch insecure base images, OS packages and libraries early, when changing a Dockerfile line is cheap. It also encourages better habits, like pinning image digests or upgrading base images regularly. The downside is obvious: anything that relies on “developers will remember to run it” eventually drifts. Some folks wire these tools into git hooks or dev containers to reduce friction, but you still lack a single, authoritative view of risk across all images and teams, which is what platform and security teams actually need.
Also, local scanning tends to miss “zombie” images already living in repos and registries. Those forgotten images are exactly what attackers love.
Approach 2: CI/CD pipeline scanning
CI/CD‑based análise de vulnerabilidades em containers e imagens is usually the sweet spot for many companies. The idea is simple: every time your pipeline builds an image, a job runs a scanner and fails the build if critical vulnerabilities or policy violations appear. This way, you enforce consistent rules, keep an auditable history in the pipeline logs, and push developers to fix issues as part of normal delivery, not as an afterthought. CI integration also allows you to tune thresholds: maybe you block criticals in production images, but only warn for mediums in experimental branches. Compared to local scanning, this approach is harder to bypass and fits better with “security as code” practices, because configuration lives in repo files and pipeline configs instead of oral tradition or wiki pages.
The weak point is visibility into old images already stored in registries, and third‑party images that never pass through your pipelines.
Approach 3: registry‑integrated scanning in the cloud
A scanner de vulnerabilidades integrado a container registry takes a different angle: every image that lands in your registry is automatically inspected, often within seconds. Cloud providers like AWS, GCP and Azure ship this as part of their managed registries, and there are also third‑party platforms and open‑source tools that can be bolted on. The big win is coverage: security teams finally get a dashboard that shows all images, tags and severities in one place, plus trends over time. For segurança em containers cloud com varredura de imagens, this also means you can enforce admission policies: for example, only allowing pods to run images that have passed a recent vulnerability scan with no criticals. Compared to CI‑only approaches, registry‑level scanning catches images built outside your standard pipelines, including manual pushes or imports from partner registries.
The trade‑off: registry scanning alone can become reactive if you don’t feed the results back into development and CI, so you still need good processes around it.
Necessary tools: what you actually need in the toolbox
Let’s group tools by layer, instead of by brand. First, you need at least one CLI‑friendly scanner that understands OS packages and application dependencies inside images; that’s your bread‑and‑butter scanner de segurança para containers em nuvem for developers and CI jobs. Second, you want registry integration, either via built‑in cloud features (like ECR, GCR/Artifact Registry, ACR) or via an external platform that can talk to multiple registries and clouds. Third, to tie this into runtime, add a Kubernetes admission controller or policy engine such as Kyverno, OPA Gatekeeper, or native cloud features, so scanned results actually impact which pods are allowed to start. On top of that, some teams also deploy runtime security agents, but those are a separate concern from image scanning and should be considered complementary, not a replacement.
If you’re small, pick one CLI scanner and your cloud’s native registry scanning; you can add policy later when you feel the pain.
Software for cloud image registries
When people talk about software de segurança para registro de imagens em nuvem, they usually mean systems that can 1) connect to one or more registries, 2) continuously scan images, 3) expose an API and UI with filters, and 4) integrate with ticketing or alerting tools. Some are cloud‑native SaaS platforms, others can run inside your cluster. Vendor choice matters less than API quality and how easily you can plug scan results into your existing workflows. Do you want Jira tickets created automatically for critical vulnerabilities? Do you prefer alerts in Slack, or policy enforcement in CI? Those questions should drive product selection more than sheer vulnerability database counts, because most reputable scanners consume similar upstream feeds anyway.
Check whether they support your languages and OSes; a great OS scanner that ignores Node or Java dependencies might not be enough.
Step‑by‑step: integrating a scanner into a cloud registry
The exact buttons you click will differ across AWS, GCP, Azure or GitLab/GitHub registries, but the mental steps are similar. First, pick your primary registry (or registries) and decide which will be the “source of truth” for production images. Second, enable native scanning if your provider offers it; this is often just a toggle or configuration setting, plus some IAM permissions so security teams can read reports. Third, wire one CLI scanner into your CI pipelines so that new images are scanned during builds, ideally with fail‑on‑critical options for protected branches. Fourth, configure registry‑wide scheduled scans, so existing images are periodically re‑evaluated as new CVEs come out. Finally, connect the registry scanner to your policy layer: a Kubernetes admission controller that checks image tags or digests against a “known‑good” list, or uses labels/metadata from the scanner to admit or reject deployments in real time.
At this point, you’ll have overlapping coverage: CI gates, registry visibility, and basic runtime enforcement.
Defining policies and thresholds
Technical integration is the easy part; policy is where humans argue. Decide what “good enough” means per environment. For example: in dev, allow high‑severity vulnerabilities but warn loudly; in staging, block criticals but tolerate some highs; in production, insist on no criticals and only a limited number of highs, and require an explicit exception process. Put these thresholds in configuration files that live in git, not in someone’s head. Also define how often images must be rescanned: monthly might be enough for stable base images, but weekly or even daily rescans make sense for high‑exposure services. Align incident response too: when a critical issue is discovered in a widely deployed base image, who owns the fix, who coordinates rebuilds, and how quickly must it be done? Without these answers, even the best scanners will just generate ignored dashboards.
Keep policies simple at first; it’s better to enforce a basic rule consistently than a complex matrix nobody understands.
Connecting pipelines, registries and clusters
To really get value from ferramentas de análise de vulnerabilidades em imagens docker, you need data to flow in both directions. Pipelines should push scan results and labels into the registry, enriching images with metadata like “scanned‑at”, “max‑severity”, or “compliance‑status”. Registries should then expose that metadata via APIs that your Kubernetes admission controllers or deployment tools can query. For example, an admission webhook can deny deploying any image whose “max‑severity” label is “CRITICAL” or whose “scanned‑at” timestamp is older than 30 days. This closes the loop: developers are nudged in CI, platform teams see global risk in the registry, and clusters enforce the final gate. When these three angles line up, segurança em containers cloud com varredura de imagens stops being a one‑off security exercise and becomes part of your platform fabric.
This also helps with audits: you can prove, with logs and labels, that only scanned, policy‑compliant images reached production.
Troubleshooting and common pitfalls
When teams first roll out análise de vulnerabilidades em containers e imagens, they usually hit the same walls. First, alert fatigue: scanners report hundreds of findings, many in transitive dependencies or optional packages that never run in production. To cope, you need sane baselines: suppress obviously irrelevant findings (like dev‑only tools in builder stages) and prioritize vulnerabilities with known exploits or reachable paths. Second, performance and timeout issues: large images or busy registries can slow scans, clogging CI pipelines or overloading registry APIs. Slicing images (using multi‑stage builds and slimmer bases) helps both performance and security. Third, version drift: different teams might use different scanners or databases, leading to conflicting severities. Standardize on a small set of supported tools and document how severities map to your internal risk model.
Also watch permission errors: registry scanning often fails silently when IAM roles or service accounts are misconfigured.
When scan results don’t make sense
You’ll occasionally see a scanner flagging a CVE for a package you’re sure isn’t present, or marking an issue as high severity when the upstream project considers it low. In those moments, cross‑check with another tool or with the OS vendor’s advisories. If multiple scanners disagree, treat the finding as “needs investigation” rather than blindly accepting or dismissing it. Keep in mind that scanners often look at package names and versions, not the actual code paths you use, so “false positives” are part of the game. Maintain a small, reviewed ignore list in git, with expiration dates and justification, rather than disabling entire rules. This keeps your scanner de segurança para containers em nuvem useful while avoiding the “we ignored everything so we could ship” anti‑pattern.
If your team complains that results are random, invest a bit of time in explaining how vulnerability databases work; transparency reduces pushback.
Balancing security and delivery speed
The last common problem is cultural: security wants strict gates, engineering wants fast deployments. Different approaches handle this tension differently. Local scanning is the least disruptive but easiest to bypass. CI scanning is a good compromise: you can start in “report only” mode and gradually enable blocking for the riskiest services. A scanner de vulnerabilidades integrado a container registry adds strong visibility with low friction, because it doesn’t slow the pipeline, but it needs runtime enforcement hooks to truly block bad images. Often the pragmatic path is: registry scanning for global view, CI scanning for early feedback, and production‑only blocking policies to avoid over‑breaking dev environments. Over time, as teams get used to fixing vulnerabilities, you can tighten the rules and shorten SLAs for remediation without derailing delivery.
Aim for continuous improvement, not instant perfection; the goal is fewer exploitable paths, not zero CVEs overnight.